Five Easy Auto Fixes

161338480.161338481-001_.jpg
Even with the advanced technology and computerized automotive systems that most vehicles come equipped with, there are still simple maintenance tasks that you can do that will save you time and money.

This list of DIY car maintenance projects requires few tools and no experience. If you've hung a picture or pounded a nail, you can tackle any one of them. By doing these jobs yourself, not only save money, but there are added benefits. And who knows, you just might like the hands-on experience enough that you'll move on to other DIY projects.

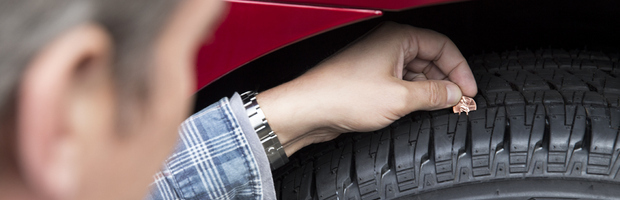
Check Your Tire Pressure and Properly Inflate Your Tires

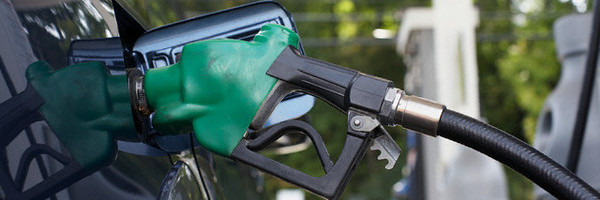
The average consumer doesn’t realize the importance of properly inflated tires. If your tires are under-inflated, it can decrease your fuel economy, costing you hundreds of dollars. Take 15 minutes, once a month and make sure your tires are properly inflated. All you need is a tire pressure gauge and an air pump. If you don’t have an air pump, you can usually find one at a gas station.

Reducing fuel cost should not be the only reason you keep your tires properly inflated. Doing so can improve safety by improving handling during emergency braking and cornering, prolong tire life.

Tire Rotation

Tires tend to wear differently depending upon where they are on the vehicle. Front tires often wear faster than rear tires because braking and cornering is more demanding on them. Plus, you can save approximately $120 a year and all you need is an jack stand, tire iron, car jack, and about an hour of your time.

When rotating your tires, be sure to follow the rotation pattern laid out in your owners manual. Also, check for defects and premature wear. You may be able to spot a foreign object in your tire that is causing a leak.

Change Your Air Filter

Changing your air filter only takes five minutes and will keep dirt out of your engine and improve fuel economy. Plus, it can save you $60 in labor costs. All you will need is an air filter, which you can pick up at any parts store, and a screwdriver. To find out how often to change your air filter, refer to your owners manual. If you live in an area with lots of dust, you will need to change your air filter more often.

Replace Bulbs and Fuses

While it may not cost much for a mechanic to change a bulb or fuse, many shops markup the price for the part. Plus, you have to drive to the garage and wait around. Instead, just pick up the bulbs and fuses from you local automotive parts store and look at refer to your owners manual.

Before you begin changing any bulb, review the instructions and take a look at the access point first. If it looks a little too tight, then take your car to the pros and let them change the headlight or taillight bulb for you. On the other hand, the fuse compartment in easy to reach. You may have to look at the electrical chart in your owner’s manual in order to find the right fuse.

Engine Oil and Filter Change

An oil change is one of the more advanced item on this list, but that doesn’t mean that you can’t do it. Anyone with a little mechanical knowledge and the right tools can change their own oil. Plus, you can save yourself hundreds of dollars a year by doing it yourself. All you need is:

  • A Car jack
  • Oil pan for Catching the Old Oil
  • Socket Wrench
  • Oil-filter Wrench
  • Recycling Bottles for the Oil
  • Rubber Gloves
  • Plenty of Rags
  • Engine Oil
  • Oil Filter


More Tips:

13-370zr-clr-005.jpg
Convertible Top Care
While, convertible tops look great when a car is new, without proper care they won’t look nice for long. Material like fabric, clear plastic and vinyl are far more delicate and vulnerable to the elements than painted surfaces. Sunshine can be especially damaging. Here are some tips on to keep your convertible top looking like new.

You should thoroughly clean your convertible top at least twice a year, but more frequently if the car is parked outside. Make sure that you use a cleaning product that is specifically designed for convertible tops and, if possible, bio-degradable. Do not use detergents or powders that contain chlorine-based bleaching agents. These cleaners can remove essential oils in vinyl tops that are essential in protecting the vinyl against the sun’s UV rays.

Before you even wet the top, try to move the car out of the direct sunlight and make sure the top is cool. Once the top is wet, spray a light coating of top cleaner evenly across the top and gently work the cleaner using a soft sponge to remove dirt. Once the top is cleaned, rinse of the cleaner while brushing a using lots of water. You want to continue to until the water runs clear.

Now, you don’t need to use a top cleaner every time you wash your car. Usually you can keep it clean with water. But if it is dirty, just use a pH neutral car wash and make sure that you rinse it thoroughly.

When you are cleaning the window, you do not want to use ordinary glass cleaners if the window is plastic. They can cause damage to the plastic. You want to use cleaners and polishes that are specifically designed for plastic windows. They will remove minor scratches and dirt while helping to prevent the plastic from discoloring.

After the top has been cleaned, use a top protectant to preserve the color and texture of the top material. This will prevent fading and cracking, and help repel dirt, grease and oil. Should you get bird dropping on your top, remove them immediately. They are very acidic and can quickly damage tops.

Once the top is thoroughly cleaned, you want to let it dry before folding it down to prevent mold and mildew.

Here are a few extra tips to make your convertible top last:
  • If possible, park your convertible in a garage or carport. If not, then use a high quality, breathable car cover.
  • To prevent creasing and scratching plastic windows, place a soft towel or baby blanket over the plastic rear window before folding down the top.
  • Use a lint roller to remove dust and lint from the top and clean the plastic window without scratching.
See our expert tips!


bts-vaden-cares-.jpg
Road Safety for Back to School and More Back to School Tips

It's that time again! The children of our community are on their way back to school, which means we have to be extra cautious on the roads in the mornings and afternoons.To help you prepare for the season ahead, we have a few driving and general tips to make the first days of school run smoothly. Here’s to an A+ in Back to School Readiness!


Driving Tip #1: Get an Early Start


If you are rushed in the morning, you may want to leave a few minutes early, especially if you pass through a school zone. Or you may want to find an alternate route to avoid traffic congestion.


Driving Tip #2: Take a Second Look


Look twice before backing out of driveways and parking spaces, and go slowly.


Driving Tip #3: Watch for “School Zone” signs


    Watch for signs indicating schools zones and obey posted speed limits.


Driving Tip #4: No Texting or Talking in the School Zone


    Don't talk on the phone or text while driving.


Driving Tip #5: Maintain a Safe Distance from School Buses


Keep your distance behind school buses, and never pass a bus when it's loading or unloading.


Driving Tip #6: Watch for Children at Intersections


    Take an extra moment to look for children at intersections, crosswalks and bus stops.


Driving Tip #7: No Tailgating!


    In heavy traffic, maintain a safe distance - at least three seconds - behind other cars.


The following are general tips to make sure that both you and your children are prepared for a successful school year.


Tip #1: Re-establish School Year Routines


Use the last few weeks of summer to get used to the school-year schedule. Re-establish bed times and practice getting up and getting dressed at the same time each day. Start eating meals on aschool day” schedule as well. If possible, plan an early morning trip or two to get the kids accustomed to getting out of the door in a hurry.


Tip #2: Nurture Independence


Your child will need to manage a lot of things on her own while in school, so prepare her by giving her age-appropriate responsibilities. These can include organizing school materials, bringing home homework, etc. A younger child can practice tying his own shoes or writing his name.


Tip #3: Create a Launch Pad


    Designate a space in your home where backpacks and lunchboxes are kept so that they can easily be located. A list of things to take to school each day can be posted in the same location.


Tip #4: Set Up a Time and Place for Homework


Establish a time and place for studying at home and make yourself available to monitor your child’s progress, as your schedule allows.


Tip #5: After-School Plans


Since most children finish school before their parents get off of work, determine where they will spend the hours immediately following school.


Tip #6: Make a Sick-Day Game Plan


Before the school year begins, line up a trusted babysitter, family member or parental group to assist when your child gets sick. You may have to sign forms ahead of time listing the people who have permission to pick up your child.


Tip #7: Attend Orientations to Meet and Greet


Attend the orientation and information sessions that your children’s school hosts at the beginning of the year. This is a prime opportunity to meet the teachers, administrators and front desk personnel that are responsible for your child(ren) during the day.


Tip #8: Talk to the Teachers


When you talk to your child’s teachers, ask about their approach to homework: Is it given as a means of practicing skills or will the assignments be factored into the child’s grade? Ask for a schedule of tests and major tasks so that you can help your son or daughter to manage his or her time.


Tip #9: Make it a Family Affair


Involve your child in preparing for his success in school. Work together to create a routine chart or schedule: After school, will she engage in recreational activities or homework first? The more input your child has in the planning process, the more likely he is to succeed.


Tip #10: Create Calendar Central


Create a centralized space in your home for all family calendars and schedules. This is a great way to coordinate school events, after school programs, volunteer work, medical appointments and more.


Tip #11: Plan Before You Shop


Take a day and assess each child’s clothing needs before shopping for new uniforms or outfits. Have a super laundry day (or two) to make sure that everything is clean and ready to go. If there are items that can be recycle from an older child to a younger child, do that as well. As for school supplies, make sure that you have an up-to-date list from the school and shop early!


Tip #12: Gather Your Papers


Be sure to have your immunization and medical records in a convenient location. Also keep a copy of your child’s birth certificate handy, just in case it’s needed for school registration.


Tip #13: Make a Practice Run


Before school begins, make a practice run to get kids ready and out the door on time. If they are walking to school, be sure they know the the route that they need to take. If they are a part of a car-pool, be sure to leave enough time to account for rush-hour traffic. If they will be riding a bus, make sure they know the location of the bus stop and when it is scheduled to pick them up.


Tip #14: Spiff Up Household Systems


The laid-back days of summer are a thing of the past, so it’s time to get better organized in general. Work on discovering ways to clean fast, get healthy meals on the table in record time, and stay on top of the paper overload that usually occurs when children start bringing assignments home. A little preparation time now will save you lots of time later.


Here’s to an awesome school year, both on the road and at home!


See our expert tips!


185682587.185686654-001_.jpg
How to Properly Check Your Tire Tread
Performing regular maintenance on your vehicle will help keep your car running for as long as possible. Part of vehicle maintenance is making sure your tires are in proper working condition. While much car maintenance requires the work of a technician, this one of the things you can do yourself.

To check your tire tread, all you need is a penny. A penny substitutes for the traditional tire tread depth gauge. It’s important to determine the depth of your tire down to the 32nds of an inch, and a penny is just as accurate. Place the penny in the several tread grooves across your tire. You will also want to go around the circumference of the tire to ensure that there is no uneven wear.

Now, how do you determine the depth? Lincoln’s head should always be covered. If it is, then you have more then 2/32” of tread depth remaining. If it is not, you will need to get your tires replaced. According to most state laws, tires are legally worn out at 2/32” of tread depth.

It is important that you replace your tires when they’ve reached this depth as it’s a matter of safety. The less tread your tires have, the poorer their performance will be. Their resistance to hydroplaning in the snow greatly reduces, and traction in the snow essentially disappears. If you rotate your tires and change them out for new ones when necessary, you will not only keep your car in top of the line form but also keep yourself and your passengers safe.
See our expert tips!


Back to Tips and Tricks